How to Add a Pinterest Widget to Your WordPress Blog
Looking for ways to add a Pinterest widget to your WordPress blog?

Embedding a Pinterest board or your Pinterest profile on your WordPress blog is a great way to encourage new followers on Pinterest. It’s one of the easiest ways to grow your Pinterest following as, chances are that if someone likes your blog content, they’re going to like your Pinterest content too.
I have a Pinterest widget in the sidebar of my blog, meaning there is a direct link to my Pinterest account on every single blog page I create. It displays the last few pins I’ve pinned, but you can customise your widget to display either your profile or a specific board.

How to Use the Pinterest Widget Builder
The first thing to do is to head over to Pinterest Developer Tools and use the Pinterest Widget Builder. Here you have the option to create a few different widgets, depending on your needs. You can create a Save button, a Follow button, embed a specific pin or board or embed your whole Pinterest profile.

How to Add a Pinterest Widget to Your WordPress Blog
Let’s go through how to add a Pinterest widget to your blog. It’s simple to do and will help you grow your Pinterest following over time.
On the Pinterest widget builder page, click on Profile.

Type in your Pinterest account URL. If you’re not sure what it is, open Pinterest and copy it from your account page there.

Choose the size you want the widget to be. There are various options, including square, sidebar or header, or you can create your own custom sized Pinterest widget. Mine is 300 px wide by 400 px tall.


Check the preview. Make sure you’re happy with how the widget looks.
Copy the HTML code and head back over to your WordPress blog. Decide where you want the widget to appear, and use a HTML block to paste it in. You can add them in blog posts, side bars, on pages – pretty much anywhere you can add in HTML.
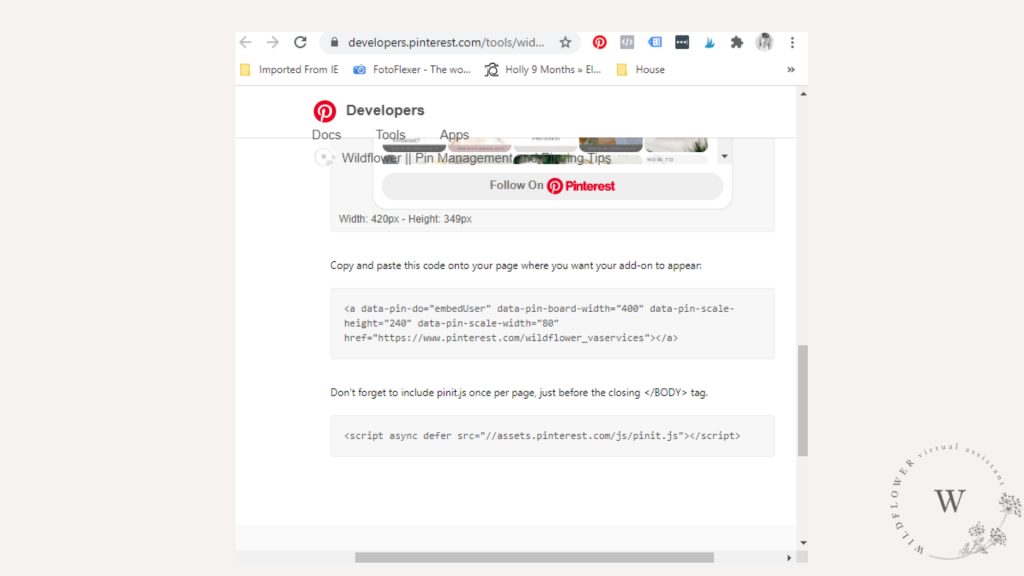
Don’t forget to add in the extra pinit.js code to your website. To do this, use a plugin called Insert Headers and Footers and paste the code into the Footer section there. This will add the code onto your website and your Pinterest widget will display correctly.

In summary:
- Click Profile.
- Type in your Pinterest account URL.
- Choose your widget size.
- Check you’re happy with the Preview.
- Copy and paste the HTML code where you want the widget to appear.
- Add the pinit.js code to your website.
How do I add a Pinterest board to my Blog
Follow the above steps, but instead of selecting Profile, select Board and type in the URL of the board you want to embed.
How to Add a Pinterest Follow Button to my Blog
If you want to add a Pinterest follow button to your blog, you can use the same instructions as above but select the Follow Button option instead. Add this to your side bar, or embed it in your blog posts and enable readers to follow you on Pinterest. You can read this post on more ways to get more followers on Pinterest if you want to grow your following.
There you go! How to add a Pinterest widget to your WordPress blog. I hope this post was useful!


Wow, this is very helpful! I didn’t know how to add Pinterest to the widget but it’s really easy! Great tip!!! Thank you a lot! 😉
You’re so welcome Sandra! I’m glad it was useful and hope it brings you many more followers for your blog 🙂